Remember “the dress?” Was it gold and white or black and blue? The answer comes down to an issue of illumination and white balance. Cameras are “stupid” – even on smartphones – and without proper instruction by the user, they simply follow their programmed orders.
What is White Balance?
In microscopy as in life we need light to see color, but light also has a color component to it (a spectrum) and that, in turn, imparts color to the specimen and the resulting image (combination of illumination and color in the specimen itself). White balance goes far beyond the concept of color temperature, and that's a good topic for another blog. The purpose of white balancing is to normalize the impact of the light source’s spectrum. Basically, white balancing works by adjusting the color channels of the camera to achieve white pixels where they should be white, and grey pixels where they should be grey. Cameras “see” a sample in terms of red, green and blue (“RGB”) color channels (see
Color Cameras in Microscopy). In an 8-bit image, each color channel has 256 grey levels where black = 0 and white = 255; each pixel is assigned a value for each of the three channels thereby “colorizing” the RGB image that we see.

Figure 1. The effect of voltage of a halogen light source on color in an image.
White balancing is intended to make neutral objects, such as the area around a piece of tissue, appear neutral grey (NOT white). Figure 2 shows the histogram and corresponding image from a microscope (no slide) before (left) and after (right) white balancing. In this example, the camera software reduces intensities of the red and green channels, resulting in a neutral background with equal parts of red, blue and green.
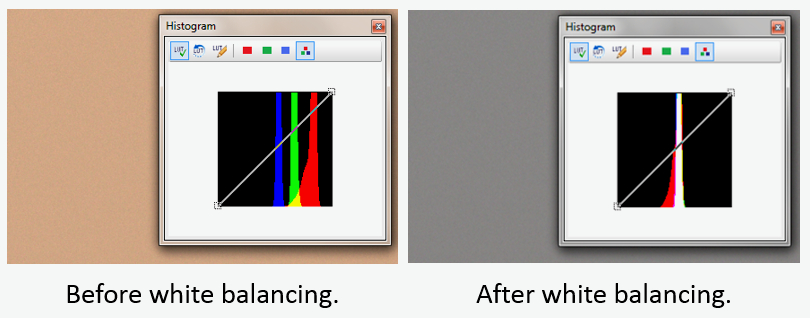
Figure 2. Appearance of imaging field and histogram before and after white balancing.
Why should I white balance?
The short answer is because white balancing is easy to do, and it produces better images. Without proper white balance, one or two colors may dominate, thus reducing contrast and our ability to discern detail in the image. Here is my recommended procedure for white balancing.
- Perform Köhler illumination. This will optimize for resolution and contrast while minimizing color artifacts caused by diffraction. Repeat with each change of objective.
- Move the specimen/slide completely out of the camera’s field of view (some researchers prefer to remove the slide from the stage; just be consistent in your approach).
- Adjust the camera exposure to approximately 70%-80% of maximum brightness as seen on a histogram. If your software doesn’t have a histogram, then approximate a medium intensity background.
- Click the white balance button in your camera software. If your image is too bright, you are saturating pixels and losing data, and the white balance won’t be accurate.
- Return the specimen to the light path and proceed with imaging.
- If you change illumination intensity and you have a halogen light source, you’ll need to white balance again.
I prefer to white balance once at the beginning of an imaging session, then all subsequent images have the same baseline. By applying good imaging controls (same equipment configuration; adjust image brightness using exposure time, NOT light source power; etc.), white balancing allows for better image consistency, and can permit good comparability between images.
White balancing is indeed a good practice, and with other good experimental design and some luck, we may be seeing your work on the cover of Nature.
Thank you for reading.